Back in November of 2020 WCE held a Workshop called How to Photograph Like a Pro. During this Workshop Leslie Osbourne of Bessie Bakes Backdrops went over in detail on how to take professional quality photos of your products. We thought the information was so amazing we wanted to revisit a snippet of it here on our blog. Continue reading to learn about the different types of lighting, lighting angles and camera angles that can be used in photographing your product.
“Photography Principle number one ~ Light is at the heart of photography. You can get wrapped up in countless details, but in the end it all comes back to light. Light is arguably the most important element of a photo. It can make or break it, it paints your subject and it creates depth and helps give your photo a WOW factor.” ~Leslie Osbourne.
First type of lighting we will be talking about is Hard Lighting. According to photokonnexion “Hard light is found where the lighting is direct, undiffused, and is not bouncing or scattered by local objects or conditions. The flash on your camera is a hard light source. When direct and undiffused by clouds the sun is also a hard light source. A hard light source is relatively small and/or large and distant.”
Here is Leslie’s example of Hard Lighting. 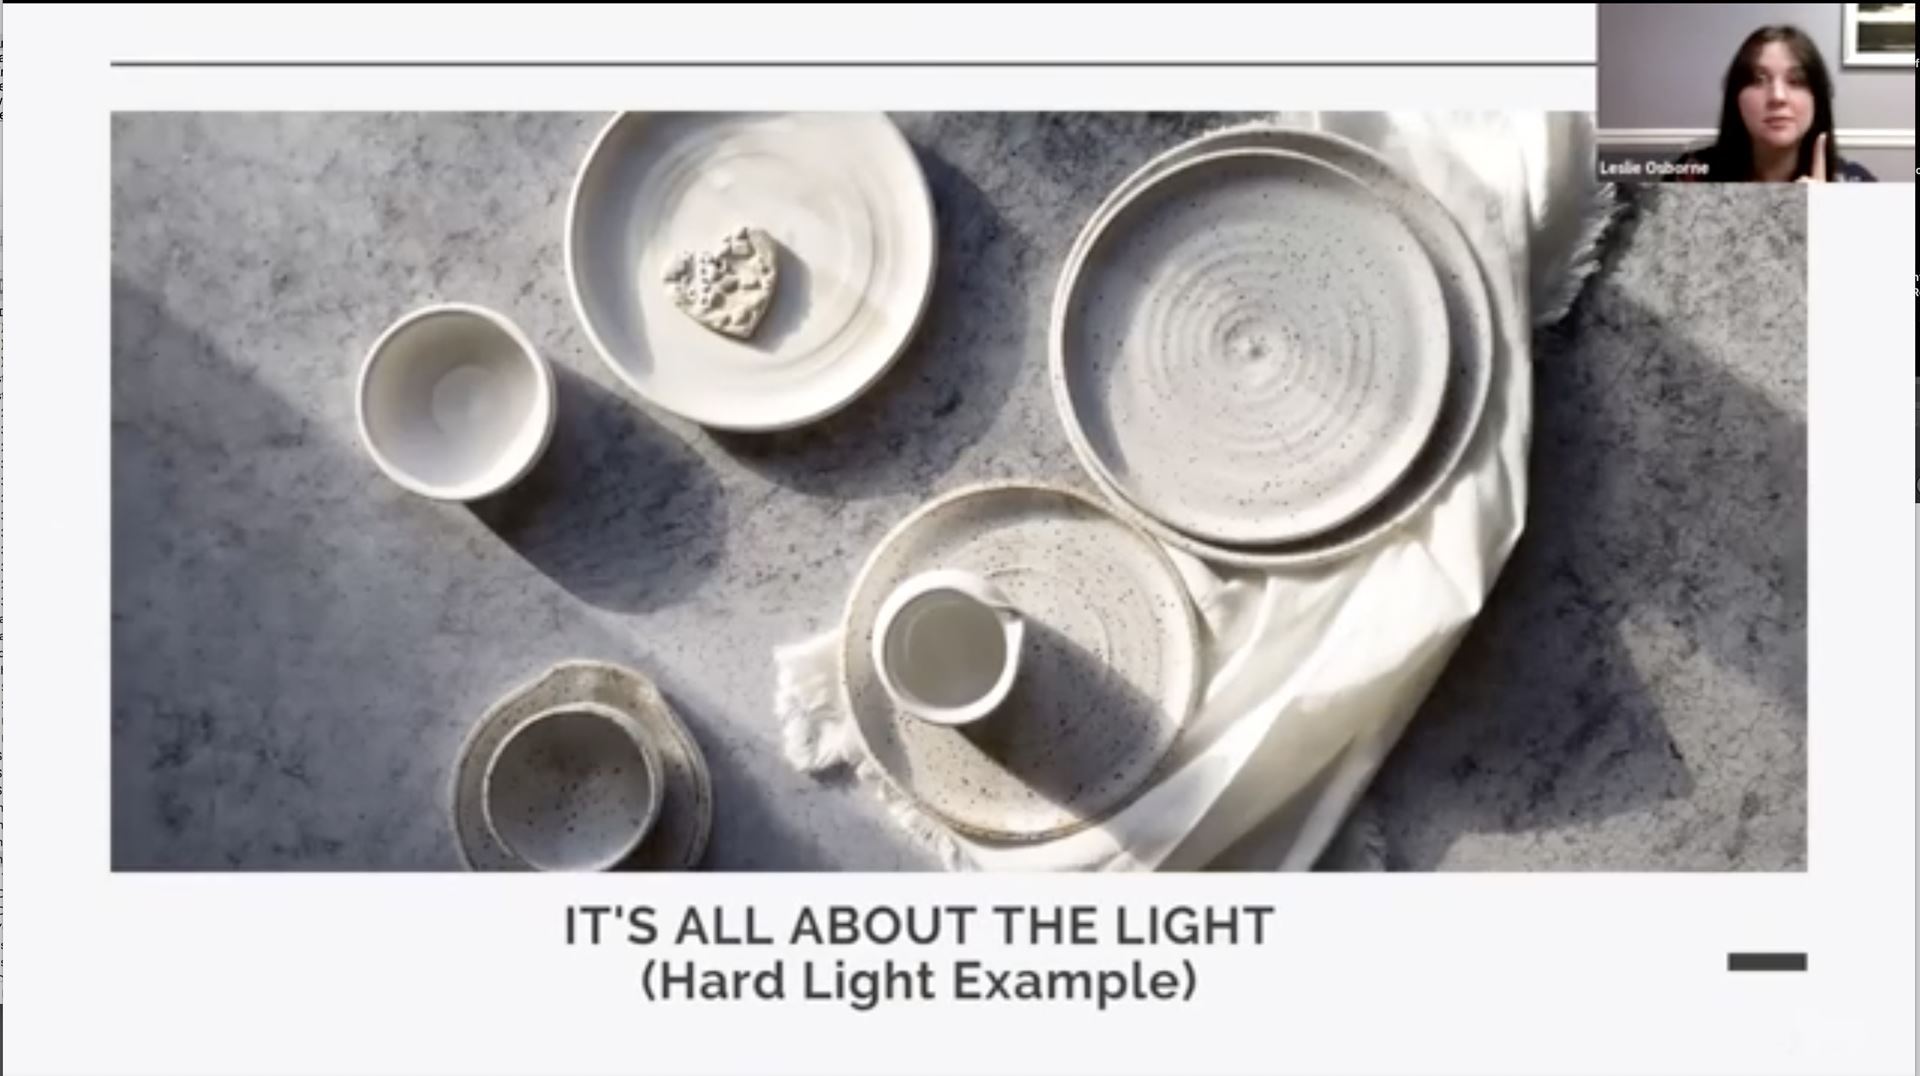
Leslie took this photo next to a window when the light was beaming through the window. There were no diffusers between the object and the direct light source which created strong shadows. She took this photo in the afternoon when the sun was starting to set and the window was facing directly towards the sun. Hard light is usually used when you want to create drama or a mood in a photo.
Next is Soft light. Soft light is described by photokonnexion “is light that creates shadows with a gradual transition from light to dark. There are no hard shadow lines. It is created from a scattered or diffused light source. Soft light is found where the lighting is indirect or where it passes through a diffuser, clouds or some other medium which scatters the light. Diffused light can be light that has bounced off one or more surfaces before it hits a photographic target.”
In Leslie’s example you can see that the shadows are much softer and gradual and you don’t have the harsh light coming through the photo. 
The lighting is much more even throughout the photo. Soft light is diffused, you can get this on a cloudy day, you can get it artificially with parchment paper or a translucent curtain over your light source or window.
Now onto directional lighting. First up is Backlighting. 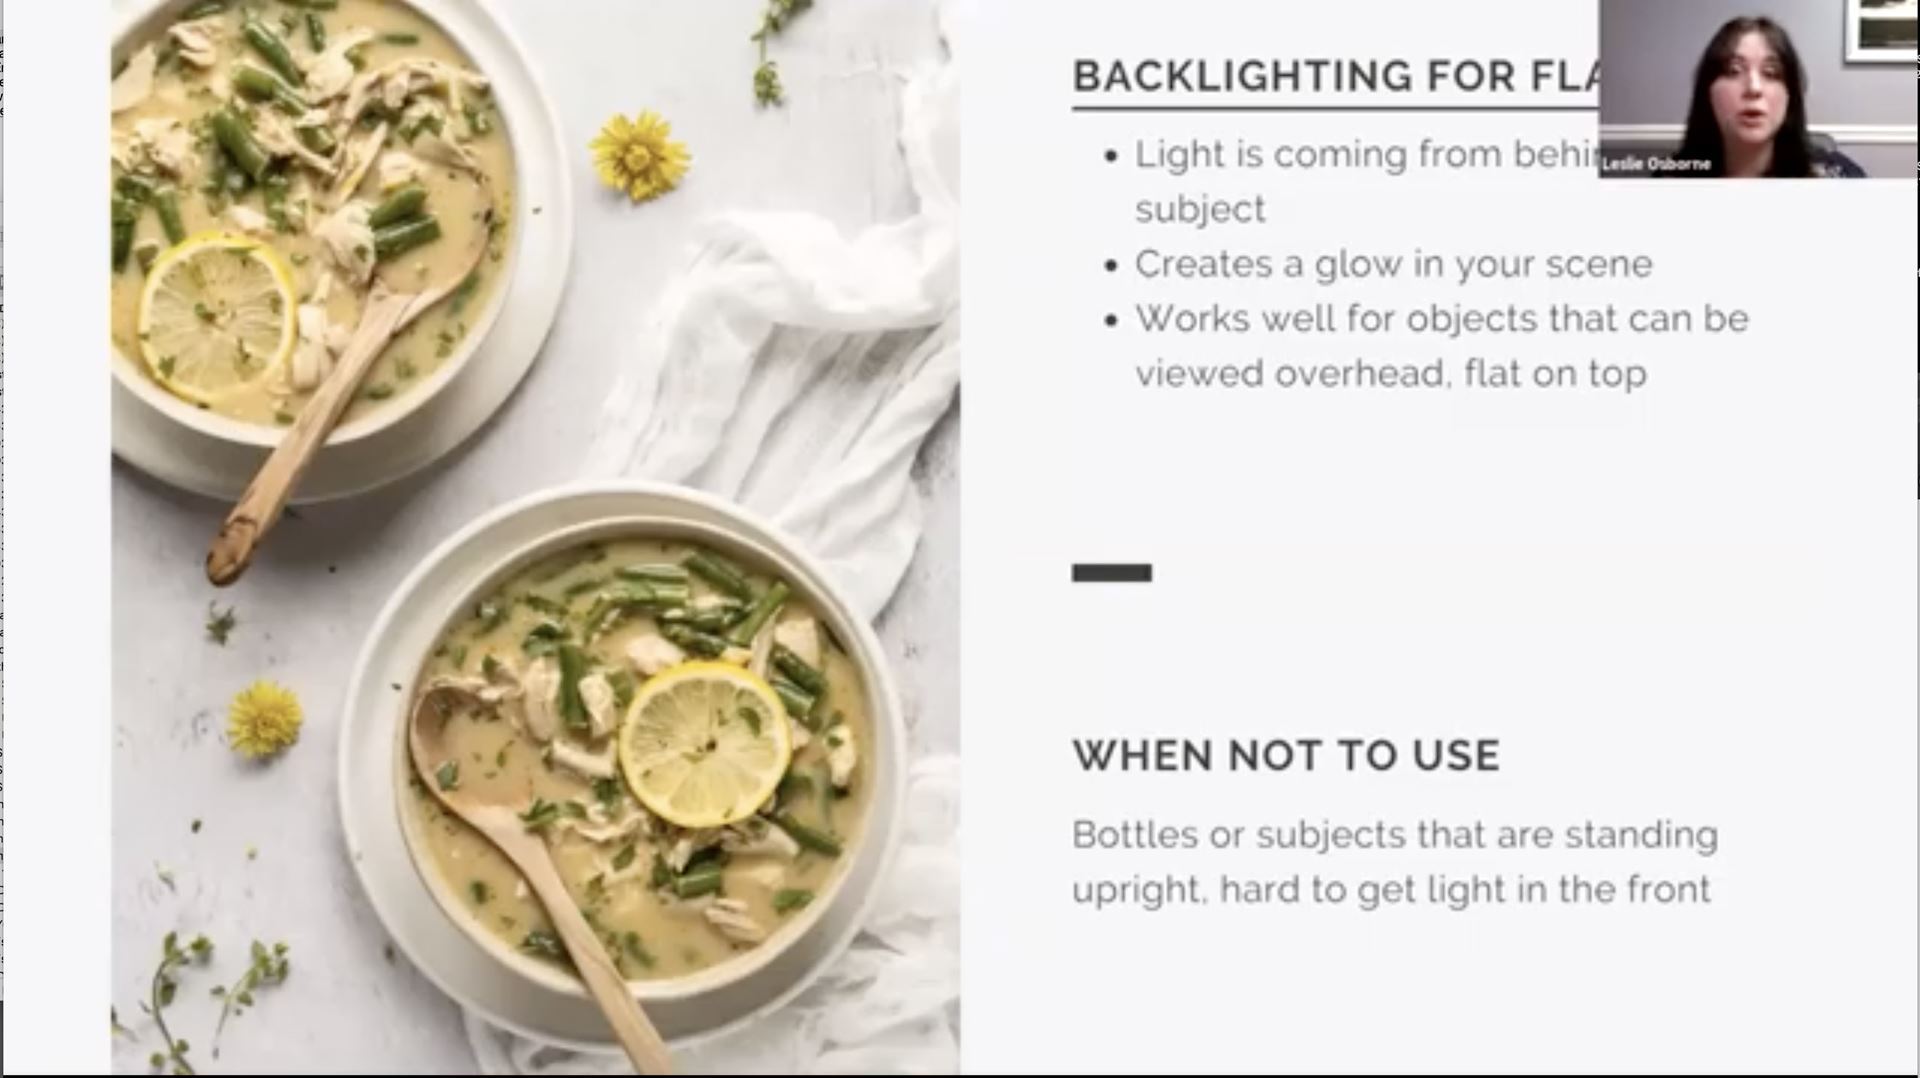
Leslie described backlighting as “lighting up your photo from the back of the scene. Lighting it from behind creates a very beautiful glow casting over the items you are shooting.” In the example that Leslie shows she is shooting the back lit photo from above so you can see how the backlighting casts over the objects in the photo. These photos work the best for objects that can be viewed from above, such as a table spread. This type of lighting does not work well with objects such as “bottles, or subjects that are standing upright”. You will lose the detail in the front of your object, so if you have a label on the bottle you want to be clear you may not want to use this type of lighting.
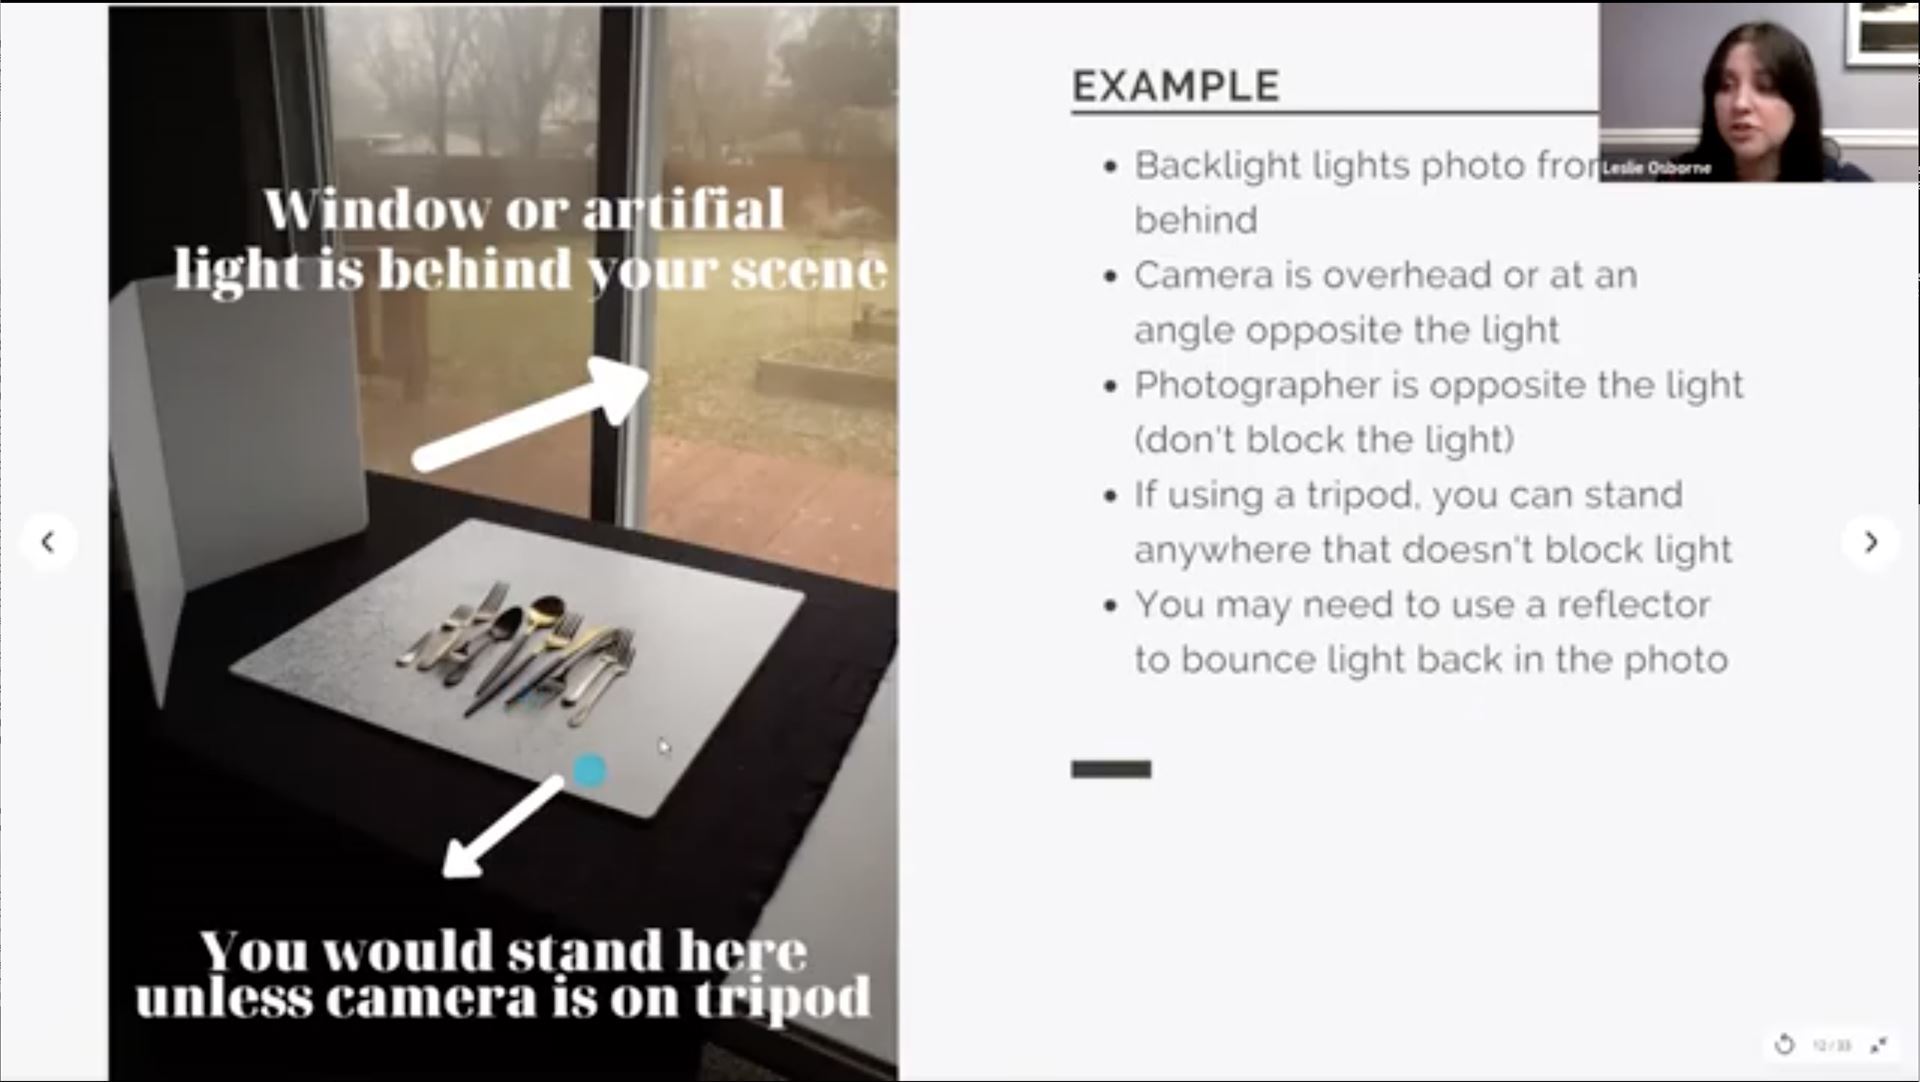
You can see in this behind the scenes of a backlit photo that:
-
Backlight lights photo from behind
-
Camera is overhead or at the angle opposite of the light (don’t block the light)
-
Photographer is opposite the light (don’t block the light)
-
If using a tripod, you can stand anywhere that doesn’t block the light.
-
You may need to use a reflector to bounce light back into the photo
Another type of directional lighting is Side Lighting.
In the Workshop Leslie explains Side Lighting as lighting that “comes from the side of your photo from either the left or the right. So, you can have a window or artificial light on either the left or right side of your scene” She goes to say that side lighting is “generally much more even in the way that it lights your photo”

In Leslie’s example of Side lighting she uses diffused (or soft light) side lighting which creates softer shadows and has more even lighting. In this particular photo Leslie used a reflector to bounce light back into the photo so the lighting even throughout the photo and the side of the photo opposite of the light didn’t fall into shadows. This is a good lighting situation for the bottles with the labels.
Overview on Side lighting for Flatlay:
-
Light is coming from the left or right of the subject
-
Lights your subject evenly
-
Also works best for photos taken head-on like a burger or items standing upright
Leslie added “Side lighting is consistent and it’s a go-to lighting angle”.
Leslie goes on to explain the option of a mixture of both back and side lighting.
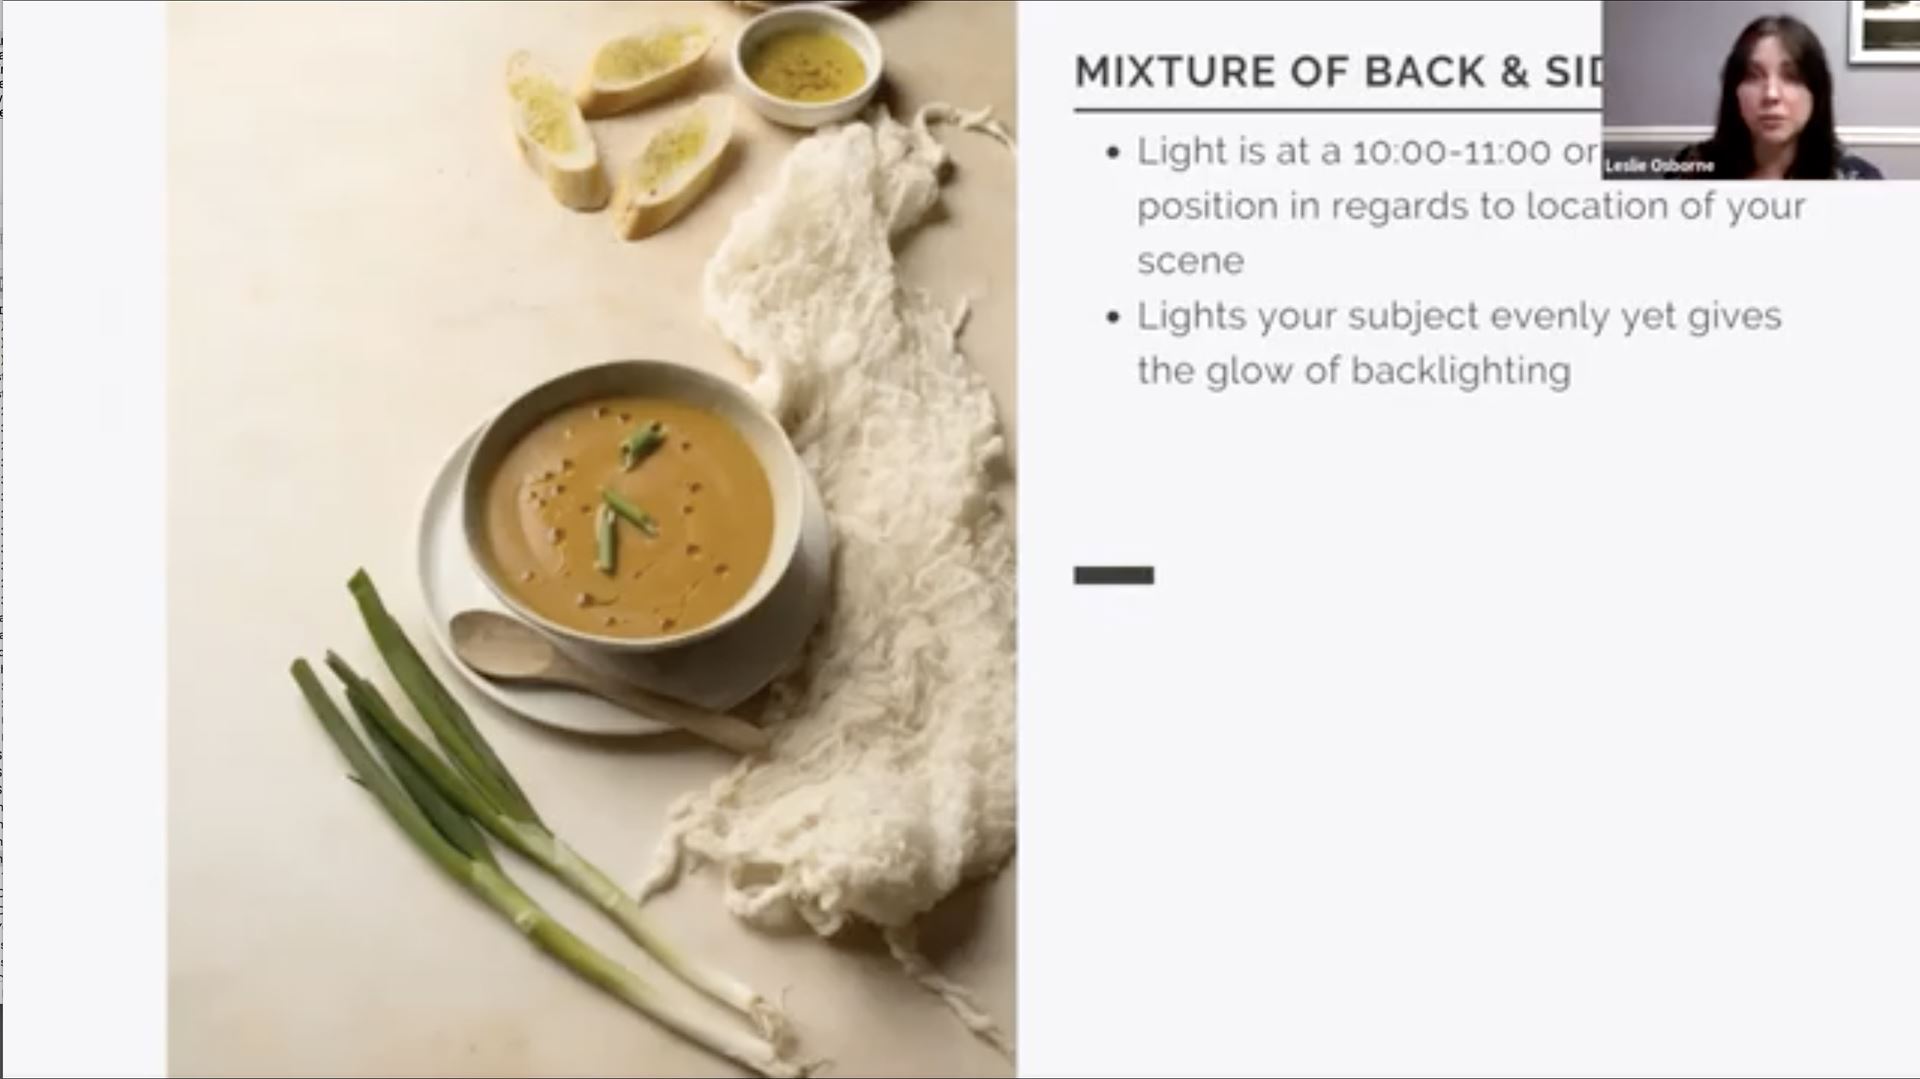
Back and side lighting can be achieved when light is at a 10:00-11:00 or 1:00-2:00 position in regards to location of your scene.
The benefits of combining back and side lighting is that it “lights your subject evenly yet gives the glow of backlighting”.
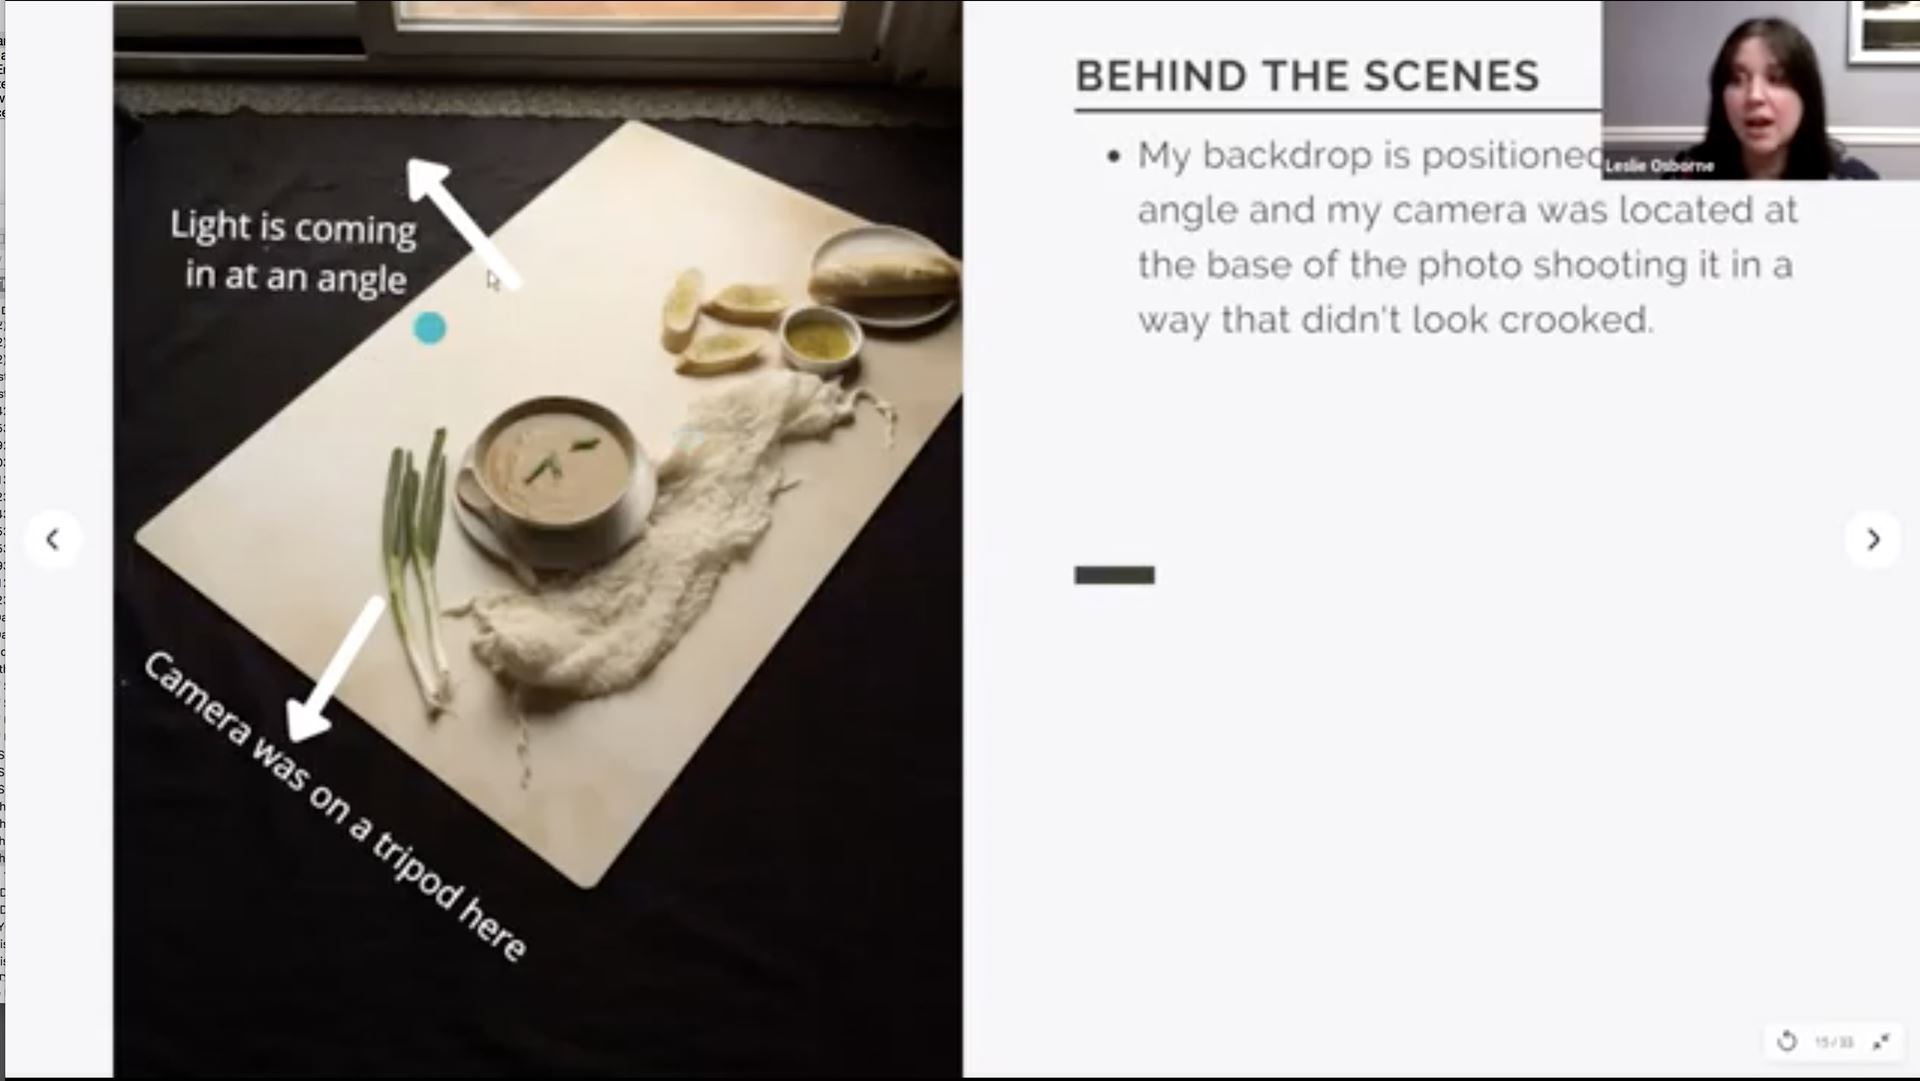
Below is a behind the scenes of how Leslie achieved the lighting in this particular photo.
In the behind the scenes Leslies backdrop is positioned at a slight angle and her camera was located at the base of the subject she was shooting as she didn’t want the photo composition to look crooked.
Next up on directional lighting is Overhead lighting. This is when the lighting is positioned directly over or above the subject. When photographing food or objects Leslie does not suggest having the “lighting directing above or even directly in front of it. What this does is it flattens out the shadows and it doesn’t allow for enough dimension” This lighting could be ok when shooting a person. 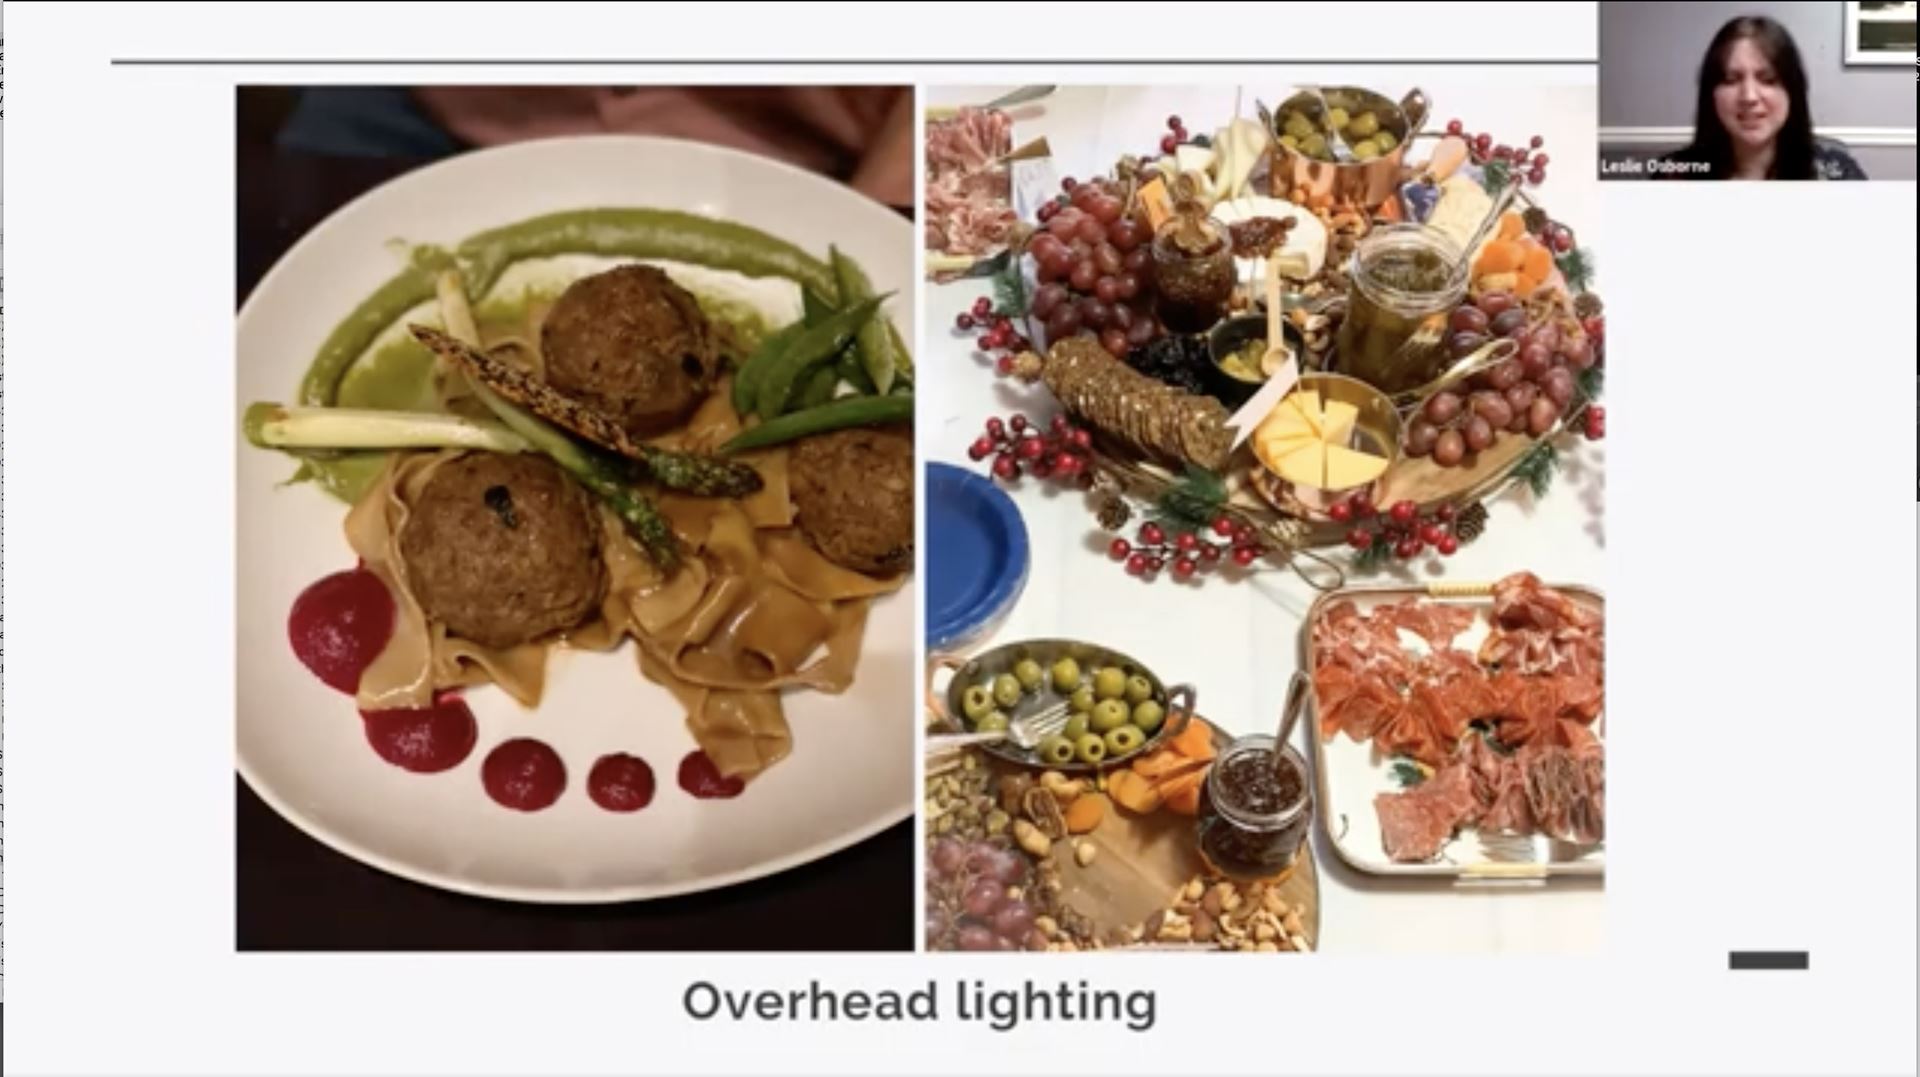
Leslie shot the example photos in a restaurant (right) and on her dining room table (left). You can see that the objects look flat and the overhead light is unflattering for food. You can use overlight to showcase your product on your website to show all of the detail with little shadow. When using overhead light use an infinity backdrop or light box that can reflect the light all around the object. But, for food or product STYLING photos it’s best to stay away from overhead lighting.
Camera angle is also important when taking a photo. In this photo Leslie shows three examples of different types of angles.
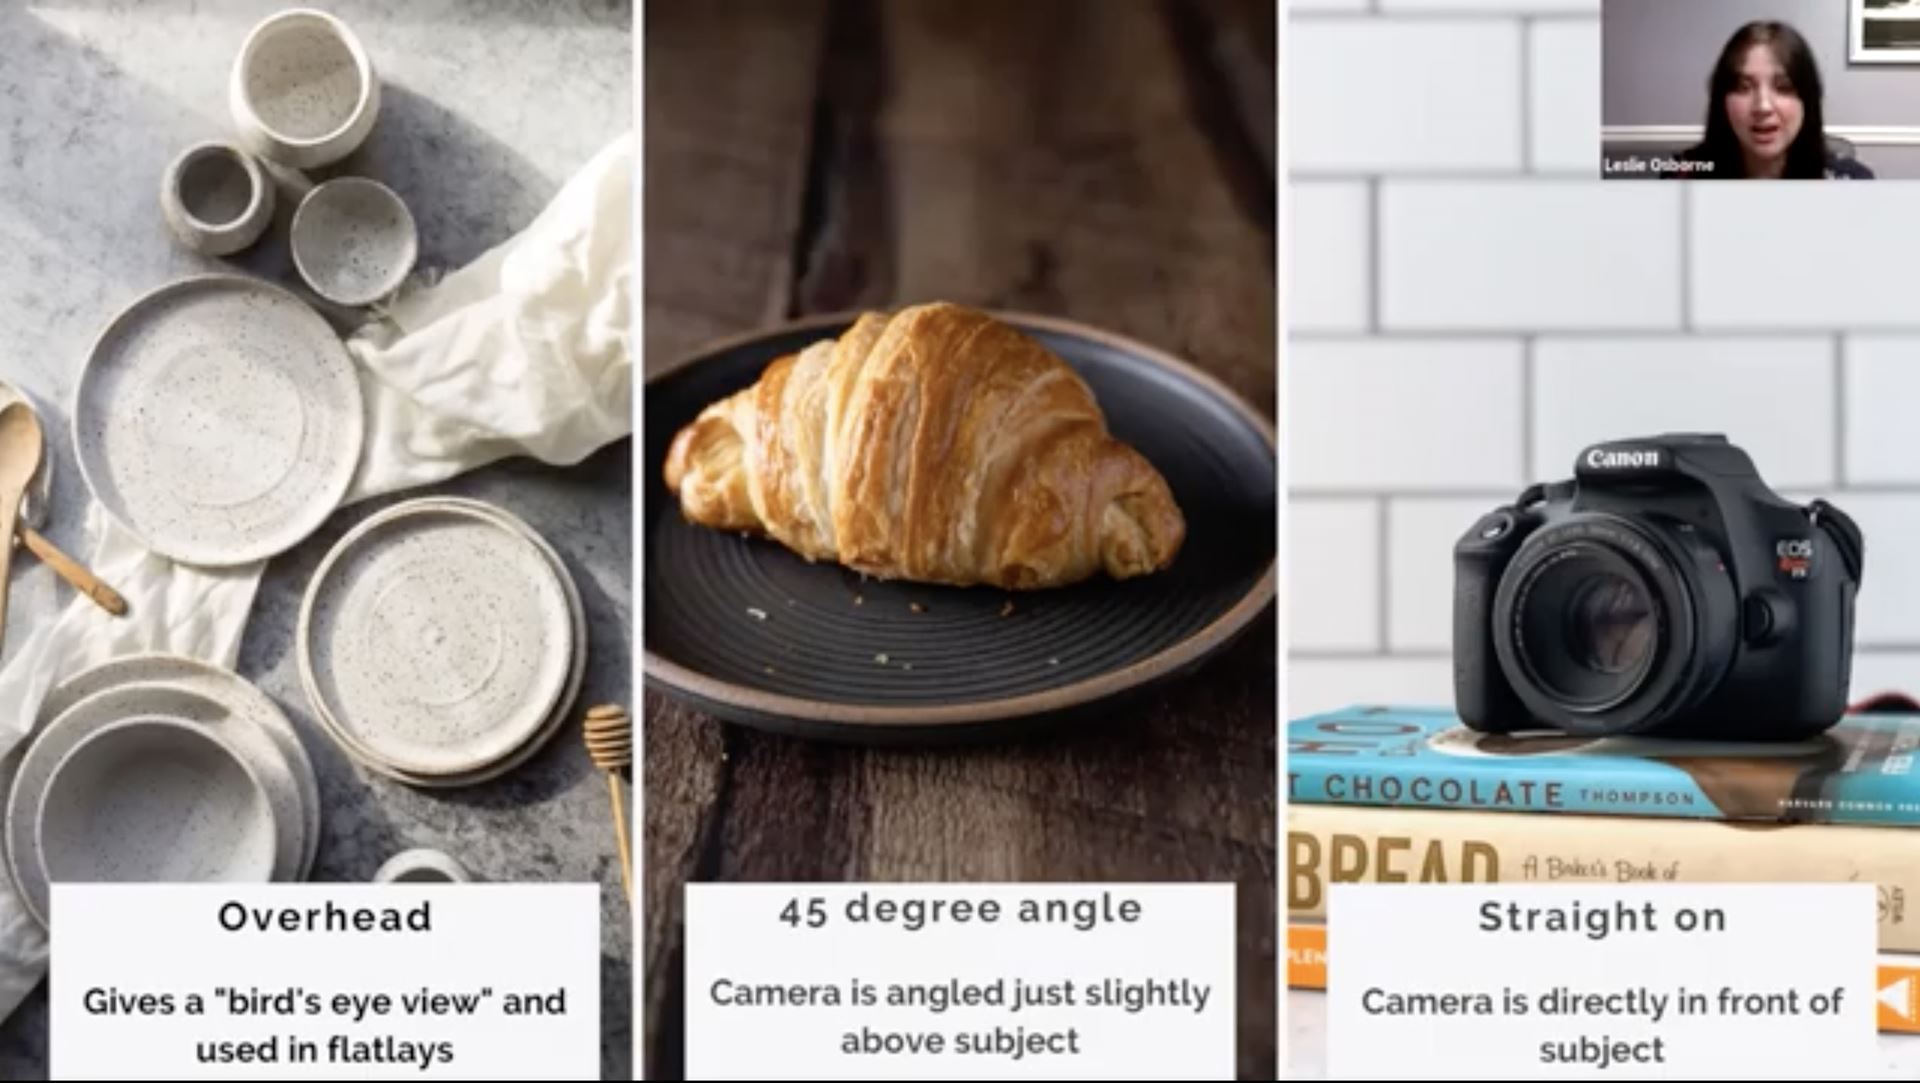
~ Overhead Angle: Gives a “birds eye view” and used in flatlay photos
~ 45 degree Angle: Camera is in front of the subject, but angled just slightly above it
~ Straight On Angle: Camera is directly in front of the subject
There is a plethora of knowledge that Leslie gives in the almost 1 hour long How to Photograph Like a Pro Workshop. You can watch the workshop HERE. And you can learn more about Leslie Osbourne and how to purchase the beautiful backdrops that Leslie uses in some of her examples at www.bessiebakesbackdrops.com.
Our goal here at WCE is helping you find ways to make your business life easier! If you have any questions please contact us at wearewce@gmail.com. And if you did find this helpful….please don’t miss any more of our upcoming virtual workshops! You can find them in the menu bar under Upcoming Events or you can click HERE!


%20-%20JKLM%20Resourceful%20Visionaries.png)
%20(2)%20-%20Janette%20Cates.png)